Posted on 1 Comment

Modding Robocop: Rogue City, and other UE 5+ Games

Here is a short guide for how to mod Robocop: Rogue City (RRC from here on) and other UE5+ games. This won’t be as detailed as my previous guide for UE4, so please read that first to understand everything.

Note that this tutorial is primarily meant for modifying Content, not Code, and this is based on a game without Encryption / sig files. If you see “.sig” file, then things are more complicated.

Required Software

  1. FModel: https://fmodel.app/
    • Used to quickly sift through existing pak/ucas/utoc files.
  2. FModel Mapping file for the game.
    • Robocop: Rogue City: Download Mappings
    • More mappings can be found on the FModel Discord.
  3. Unreal Engine matching the game (For RRC that is 5.2 or 5.2.1): [get from Epic Games launcher]
    • Same deal as UE4; you need the matching version to generate the files.

Other Software (not required)

  1. UE4SS: https://github.com/UE4SS-RE/RE-UE4SS
    • Enables modding beyond just content (e.g. scripting/programming).
    • I was able to get UE4SS working by using the Experimental branch. Check out their Discord to learn more.
    • Can be quite complicated. This guide won’t go into it.

Tutorial

  1. Open FModel and add RRC.
    • Navigate to the Game Selector (Directory > Selector), and add a new game, pointing to the game dir for RRC
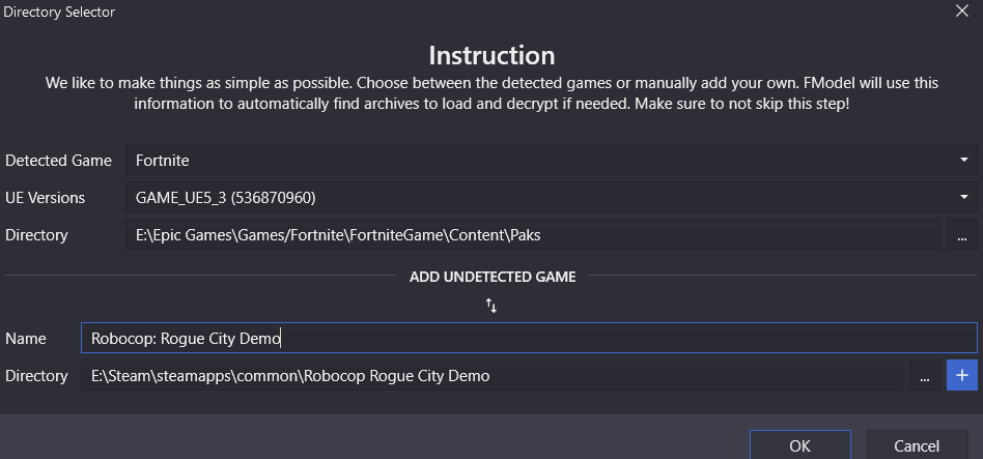
    • Press the “+” button with it filled out, and hit ok.
    • Once it reloads, go back to the same screen, find RRC from the Detected Game drop-down, and change UE Version to 5.2. Press ok.
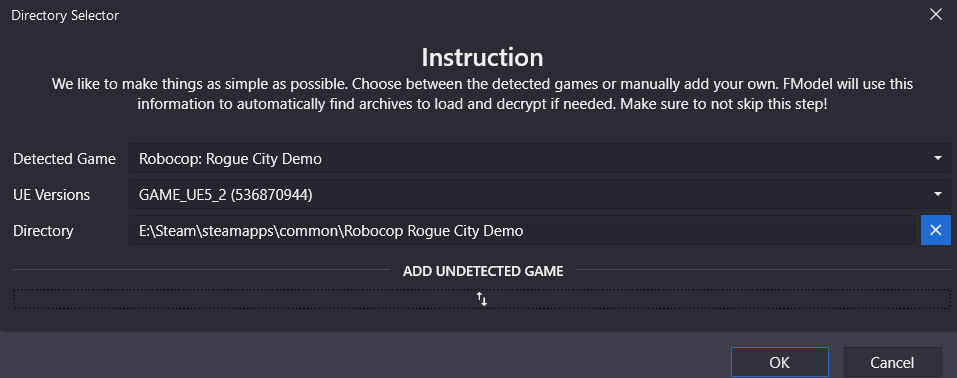
    • Once it reloads (again), apply the supplied Mapping file. This will correct loading errors. Navigate to Settings, and in the new screen that appears tick the “Local Mapping File” checkbox, and point it to the mapping. Press OK.
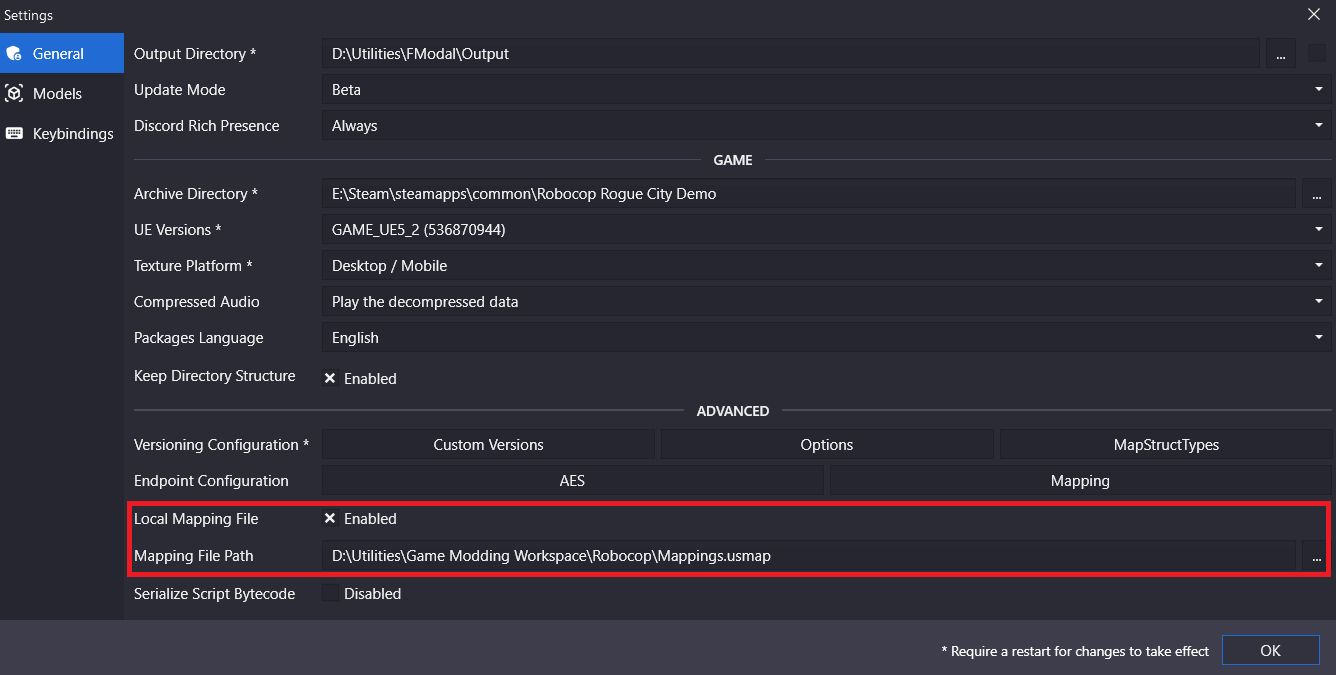
    • You can now freely explore the pak/ucas/utoc files and export any content to modify.
  2. Launch the game’s matching Unreal Engine version (RRC: UE 5.2 / 5.2.1).
    • Create a new game project matching the base directory for your title. For RRC, that is “Game” (so game.uproject). IF THIS DOES NOT MATCH, CONTENT WILL NOT BE LOADED!
    • Drop your modified files into the content browser, and arrange them into the matching folder structure from FModel. Note that “<game name>\Content” should be dropped from the path, as it is already implied within the engine (the Content Browser starts in Content afterall!)
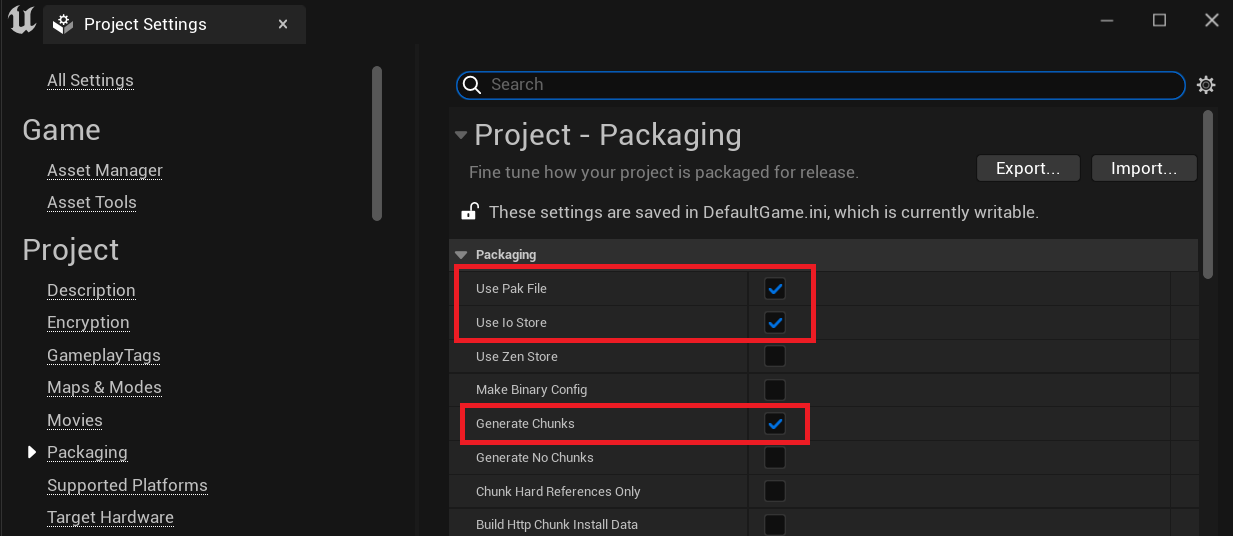
  3. Set the project to use IO Store with Chunks.
    • Navigate to Edit > Project Settings > Packaging Tab.
    • Enable “Pak File” “IO Store” and “Generate Chunks”, then close the window.
  4. Create a Chunk ID Label in the main Content folder.
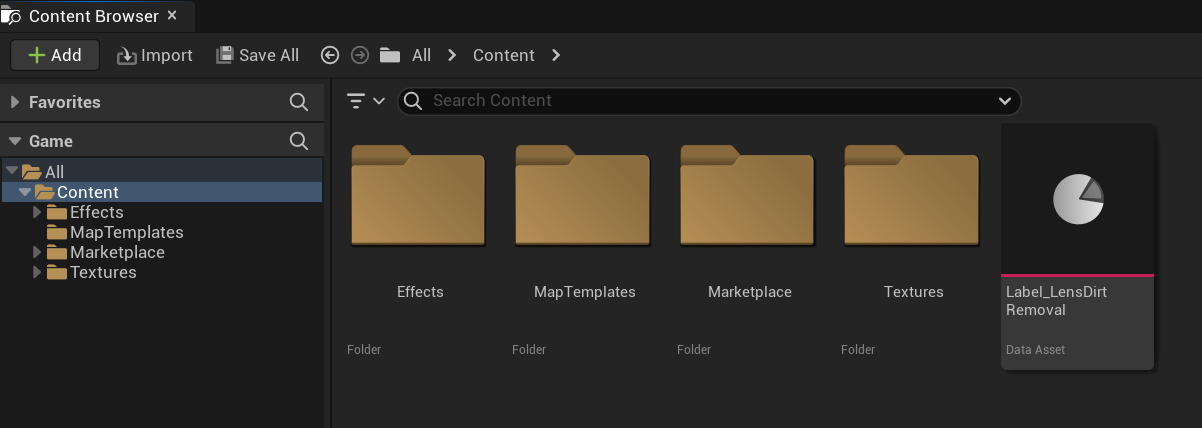
    • From the Content Browser open the Content folder (All > Content). Note that inside of this folder should be all of your sub-folders with your modified assets.
    • Right-Click in the Content Browser next to your folders > Miscellaneous > Data Asset.
    • Name this new Data Asset “Label_<mod name>” (EX: Label_ReplaceCrosshair). Check out the above image of the Content Browser to see how this should be laid out.
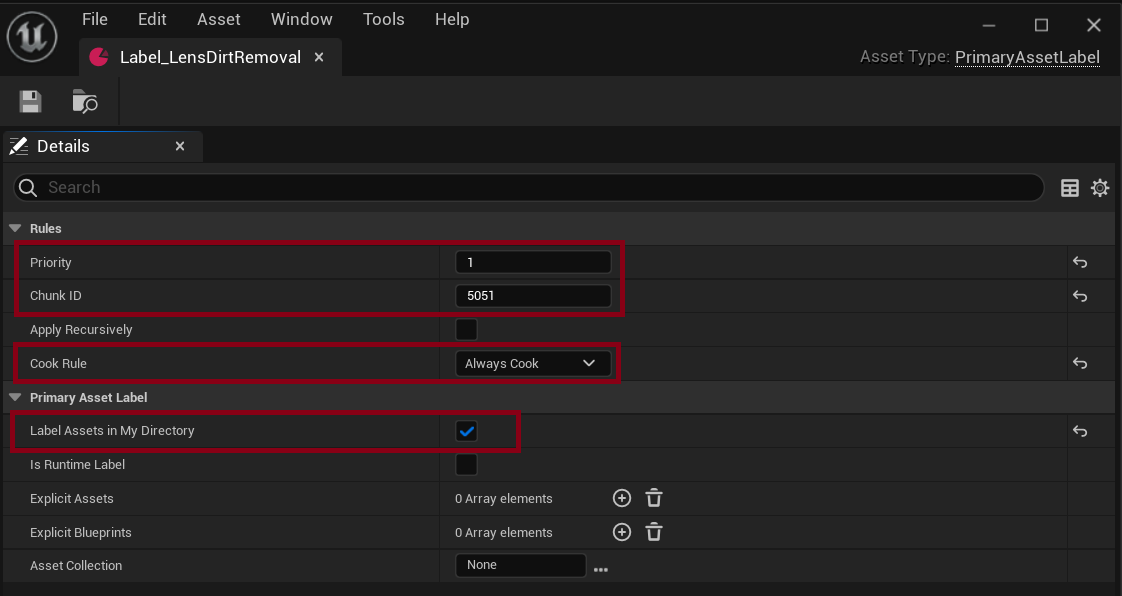
    • Open the newly created Data Asset, and set Priority to 1 (or higher), Chunk ID to a high number (1000 or higher recommended), Cook Rule to Always Cook, and enable Label Assets in My Directory.
    • You can learn more about Chunks here: https://docs.unrealengine.com/4.26/en-US/SharingAndReleasing/Patching/GeneralPatching/ChunkingExample/
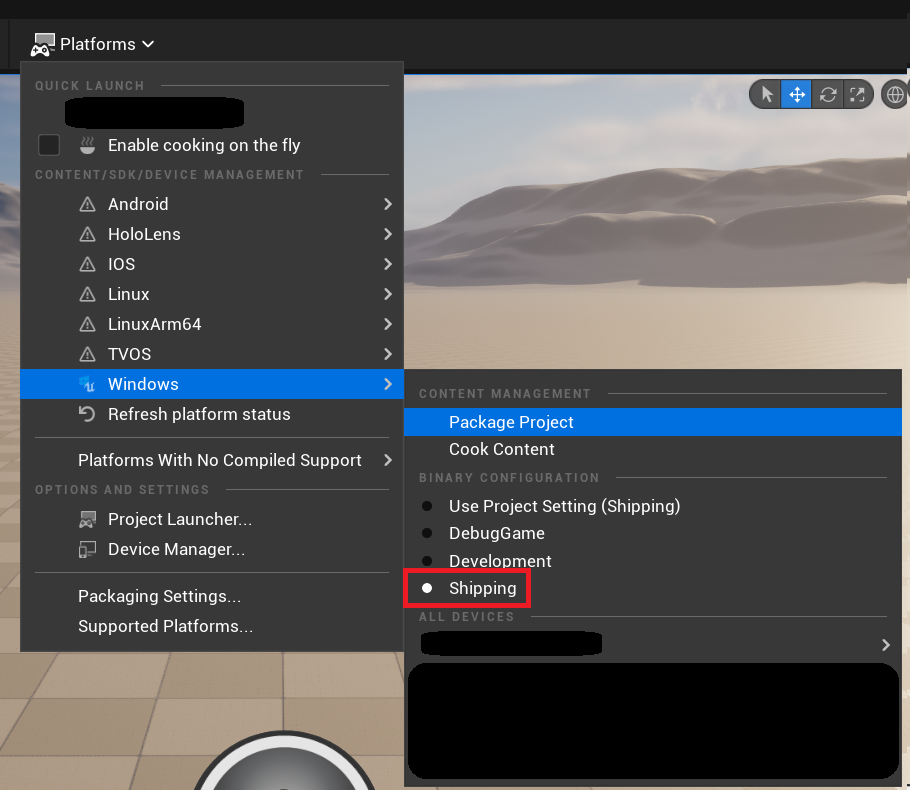
  5. Package the files for Windows. Ensure Binary Configuration is set to Shipping (this may not matter, but do it just to be safe!)
    • When asked for the folder, you can save this anywhere, just be sure to remember where it is.
  6. Navigate to the Packaged build in Windows, and drill-down into the Paks folder.
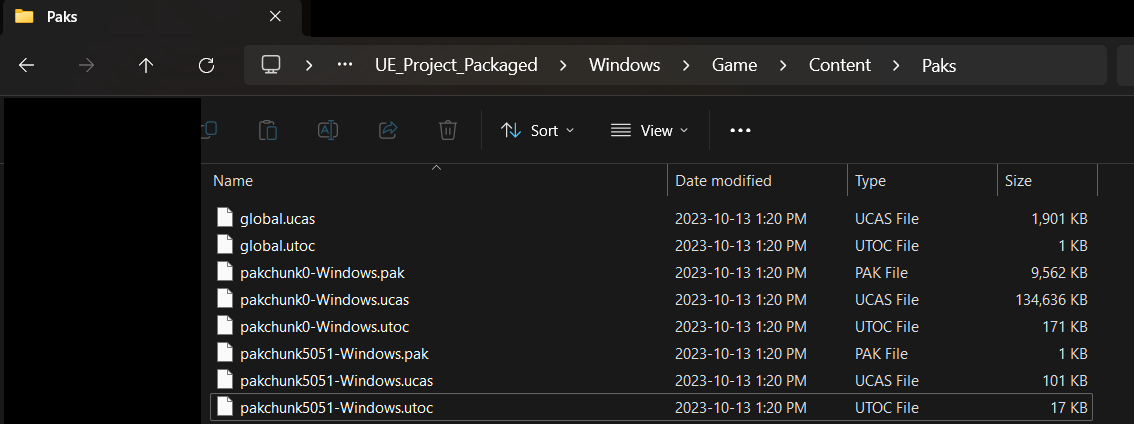
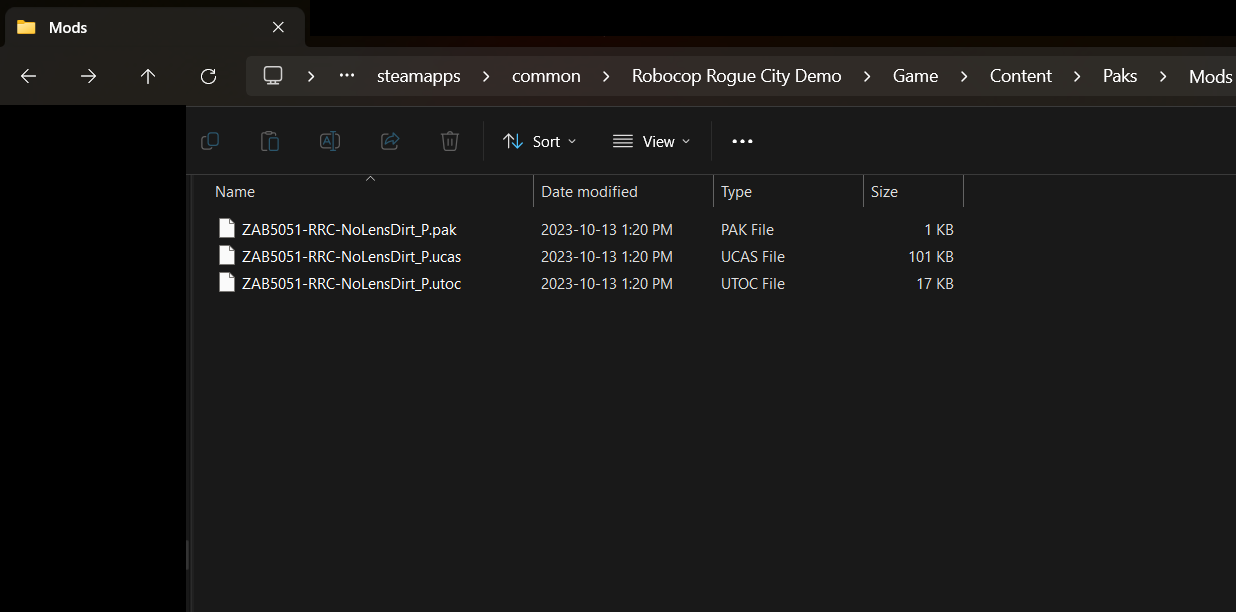
    • Copy the files with your Chunk ID from Step 4 to the Mod directory inside Paks folder (For RRC is looks like ~steamapps\common\Robocop Rogue City Demo\Game\Content\Paks\Mods).
    • If a Mods folder does not already exist, create one.
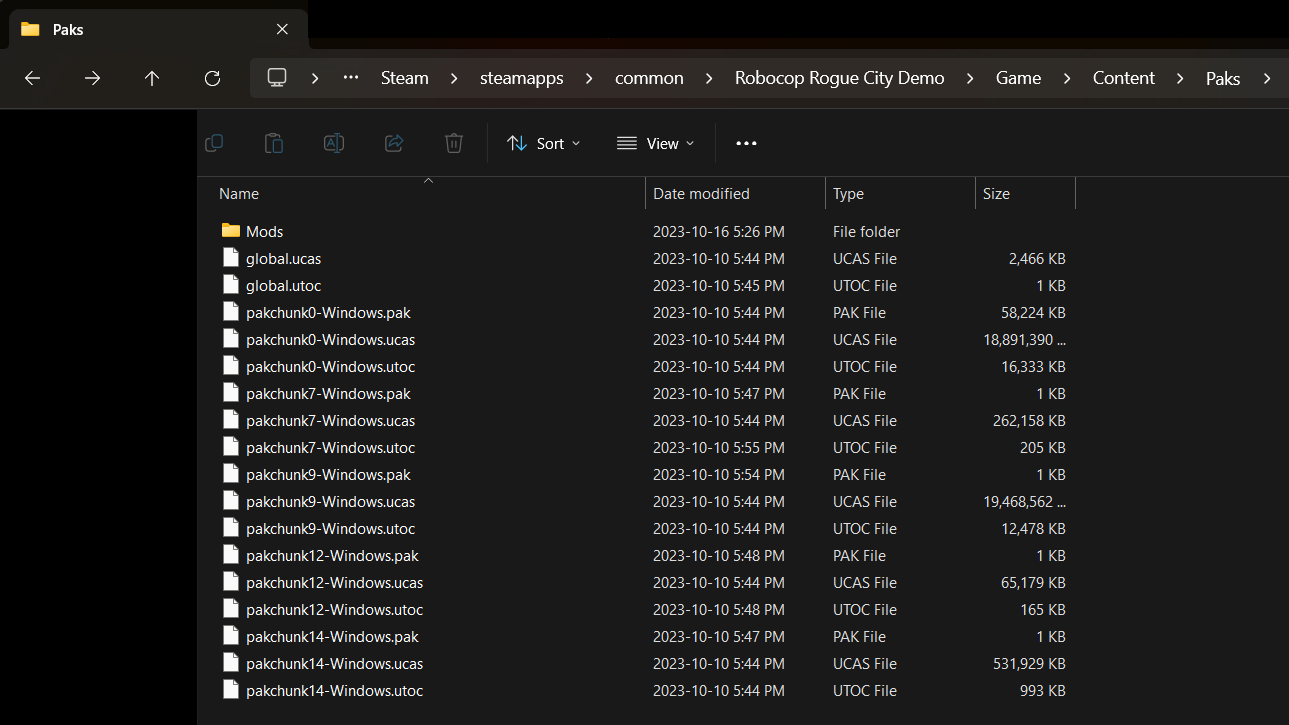
    • Note: ONLY COPY THE MATCHING CHUNK ID FILES. The other files may overwrite basegame functionality and break everything!
    • Rename each File to be specific to your mod, ending with “_P”. I also recommend keeping the ChunkID somewhere in the name so it’s easier to remember.
    • Note: DO NOT FORGET THE “_P”, AND BE SURE THEY ALL HAVE THE SAME FILENAME.
  7. That’s it! Launch the game, and your Content mods should be applied!

Optional Steps

  1. Enable per-asset Chunk ID assignment. Not necessary, but can prove useful for more complex mods.
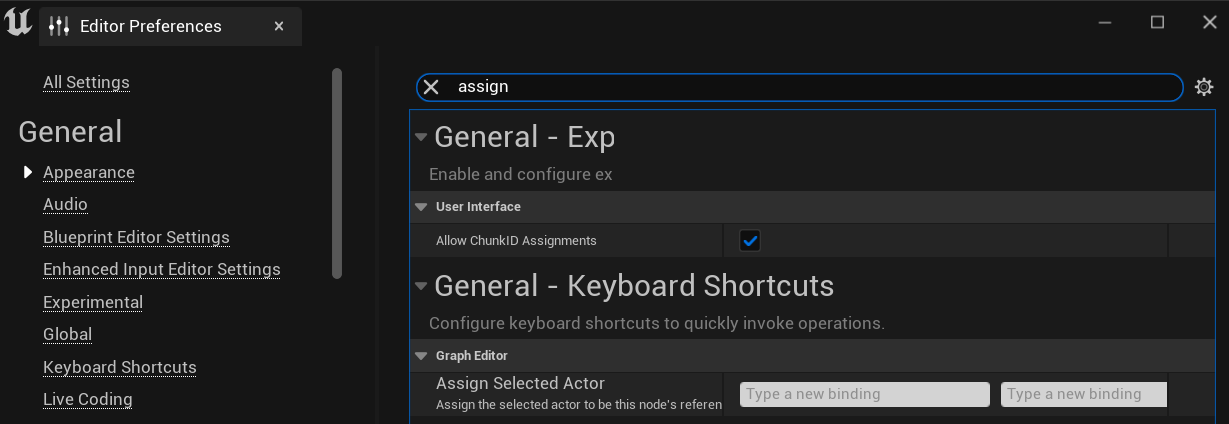
    • Navigate to Edit > Editor Preferences > Appearance Tab.
    • Search for “assign”, Enable “Allow ChunkID Assignments”, then close the window.
Posted on 4 Comments

Modding Terminator: Resistance, and other UE 4.25+ Games

Required Software

  1. UE Viewer: https://www.gildor.org/en/projects/umodel
    1. Used to quickly sift through existing PAK files.
  2. Unreal Engine matching the game (for Terminator: Resistance that is 4.25): https://www.unrealengine.com/en-US/download
    1. Create new files (uasset, uexp, etc) to be packaged into mod.
    2. The correct UE version is needed so that the PAK files match the expected version. UE 4.25 PAK files are different from UE 4.27.
  3. Unreal Pak (included with Unreal Engine). Can be found in “UE_4.25\Engine\Binaries\Win64”
    1. Unpack and Repack files for testing and release.
    2. Notes:
      1. This utility is included by default with Unreal Engine, so replace “UE_4.25” with version you have installed.
      2. Separately released versions of UnrealPak are not supported. Changes have been made to the pak system over time, and the version matching the game (or newer) is required.
  4. Unreal Pak batch files: UnrealPakBatchFiles
    1. Batch files to make Unpack and Repack easier.
    2. Drag-and-drop these in the same folder as “UnrealPak.exe”.
  5. Programs to modify the desired files.
    1. For example, Textures (TGA) can be modified with Paint.Net
  6. Optional; QuickBMS: https://aluigi.altervista.org/quickbms
    1. Extract everything from PAK files.
    2. Can be useful for ensuring you have your files in the correct folders for creating your own PAK.
    3. Will need matching script file. As of the time of writing this, you can find the script here. Just download the 4.25c version, and place it next to QuickBMS executable.

Downloads

Tutorial

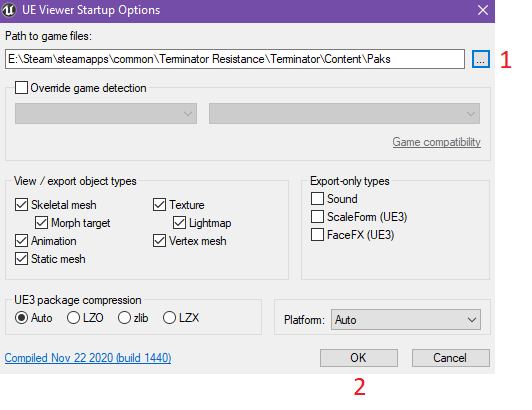
  1. Open UE Viewer and point it at the directory containing the game’s “pak” files.
    1. Press the “…” button to browse to the folder, or manually copy/paste the path into the text box.
    2. Press “OK” to continue. No other settings need to be adjusted.
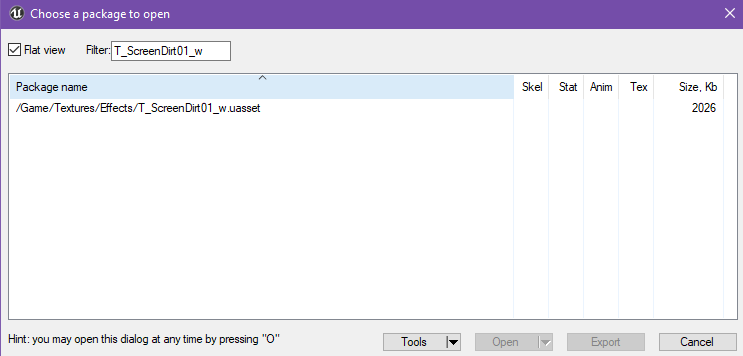
  2. Sift through the files to locate the Texture/Mesh/Model/Etc you wish to modify.
    1. Tip: Check the “Flat View” box in the upper-left corner to make searching with “Filter” easier.
  3. In this example, I will be removing the Lens Dirt effect that applies when Bloom is enabled.
    1. Through trial and error of modifying many files containing “dirt”, I found that “T_ScreenDirt01_w” was the offending texture.
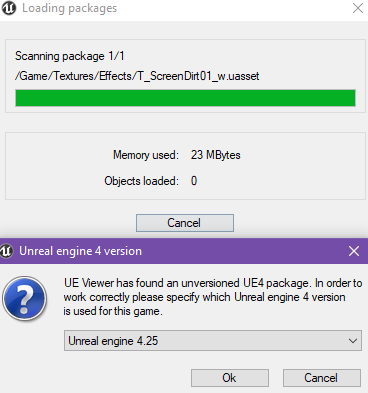
  4. Double-Click the file to view it. If asked which engine version, select “4.25” or whichever version the game in question was built on.
    1. Press “OK” to continue and view the file.
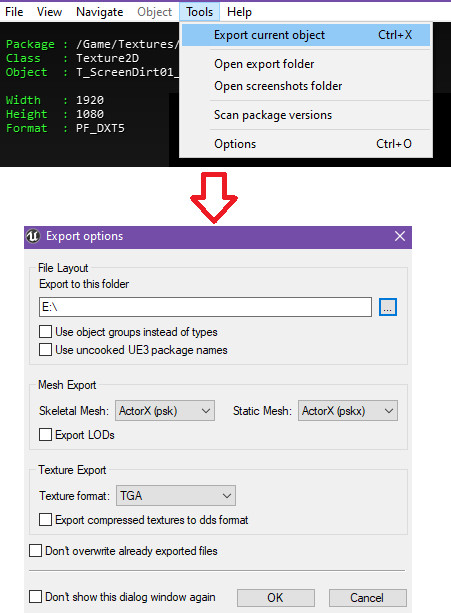
  5. If this file looks like the one you wish to modify, export it.
    1. Tools > Export Current Object.
    2. Select folder to export to, then press “OK”.
  6. Repeat steps [2] through [5] for all files you wish to modify.
  7. Adjust the files as needed. In this example, I have made the Lens Dirt effect TGA entirely transparent using Paint.Net. This way it will effectively not appear in game.
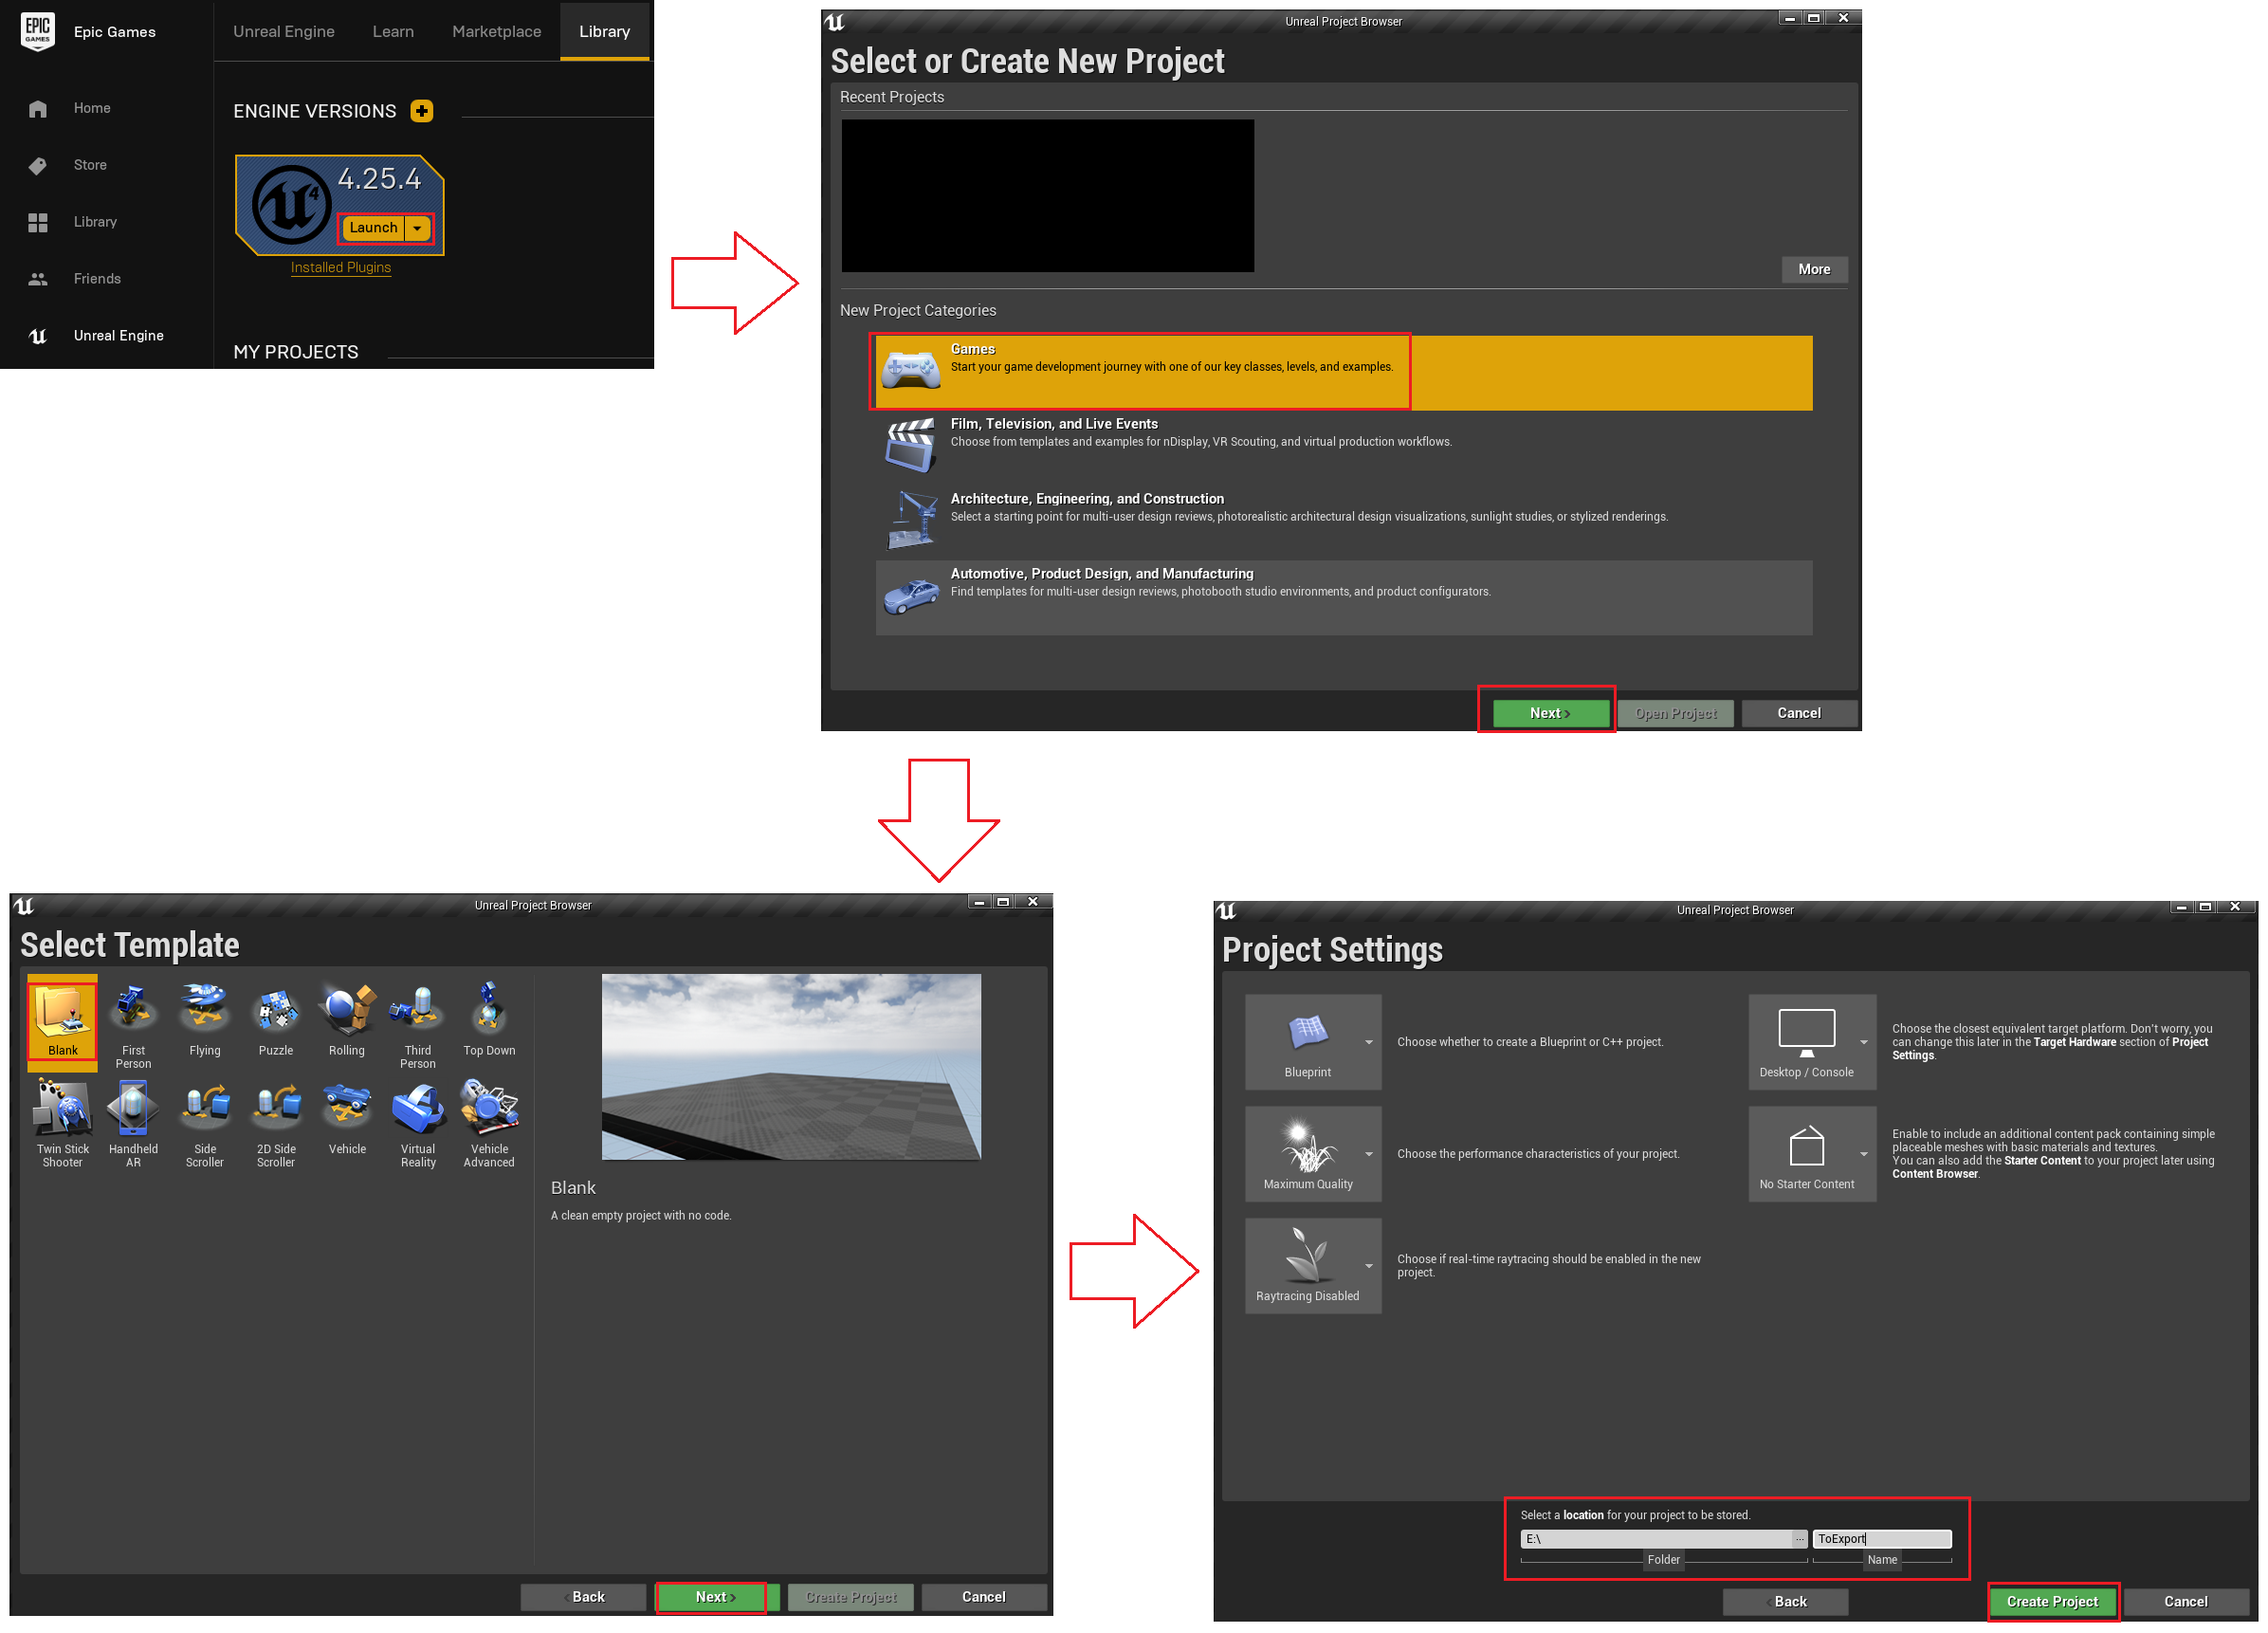
  8. Launch Unreal Engine 4.25, and create a Blank project.
    1. Set a Location and Name within the “Project Settings” window. Remember these for later!
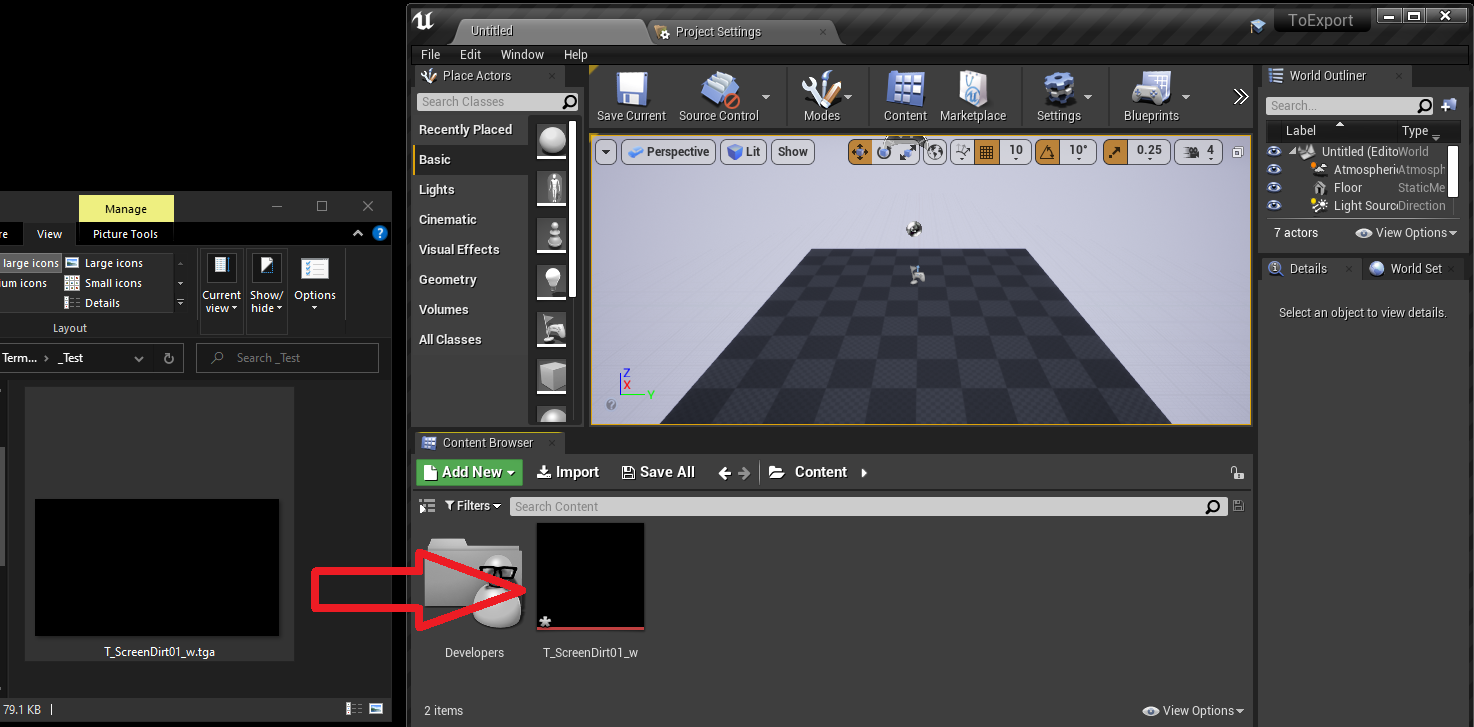
  9. Drag-and-drop the edited files into the Content Browser. They will appear with an asterisk once import completes.
  10. Double-Click the imported item in Unreal Engine, and Save it. The asterisk should now disappear.
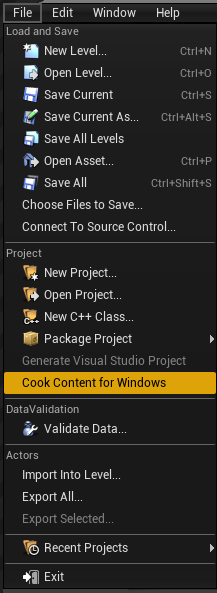
  11. Cook the project by navigating to File > Cook Content for Windows.
  12. Verify the files were cooked successfully. They can be found in “<Project Folder>\Saved\Cooked\WindowsNoEditor\<ProjectName>\Content”
    1. <Project Folder> and <Project Name> is the location and name designated in step [8].
  13. Drag-and-Drop all files within this folder that match the name of the edited files to a new location for packing.
    1. Typically a “uasset” file, as well as “uexp”, “ubulk”, and more.
    2. ALL FILES ARE REQUIRED.
    3. In this example, I had a “uasset” and “uexp”
  14. Create a new folder named after your mod, in my example this is “ZAB01_NoLensDirt”.
    1. Within this folder, create a folder structure matching the original “pak” file.
    2. Drop the cooked files into the proper folder.
    3. Note that this may not match the structure indicated by UE Viewer in step [3].
    4. You can drag-and-drop the original “pak” files onto the unpak batch script UnrealUnpak.bat (one by one). Navigate through the extracted folders manually to find the original file’s correct location.
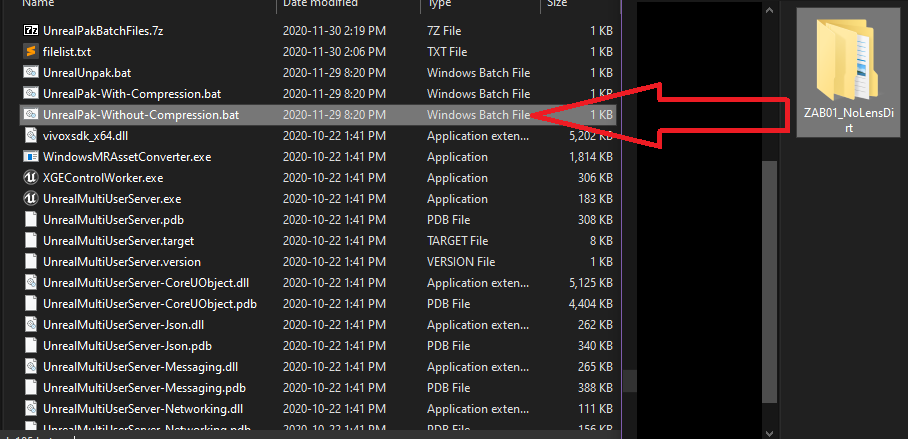
  15. Once everything is structured properly, drag-and-drop the root mod folder onto the pak batch script UnrealPak-Without-Compression.bat.
    1. Optionally you can use the compression version of the script.
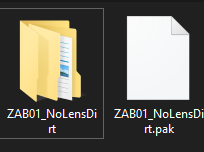
  16. If everything is successful, a “pak” file will be created next to the root mod folder!
    1. If you receive an error, be sure you are using the UnrealPak included with the Engine version you downloaded. This Engine version should match, or exceed, the version used to package the original game.
  17. Drag-and-drop the “pak” file for the mod into the directory containing the game’s “pak” files (step [1]).
  18. Launch the game, and test it out! If the mod does not appear to have been applied, check out the Troubleshooting section below.

Troubleshooting

  1. Did you adjust the correct files? There may have been multiple copies. Search around more in step [2].
  2. Did you get all of the cooked files? Repeat steps [8] through [12].
  3. Did you get the folder structure in proper order? Repeat step [14], paying close attention to the additional notes for this section. File order is key!
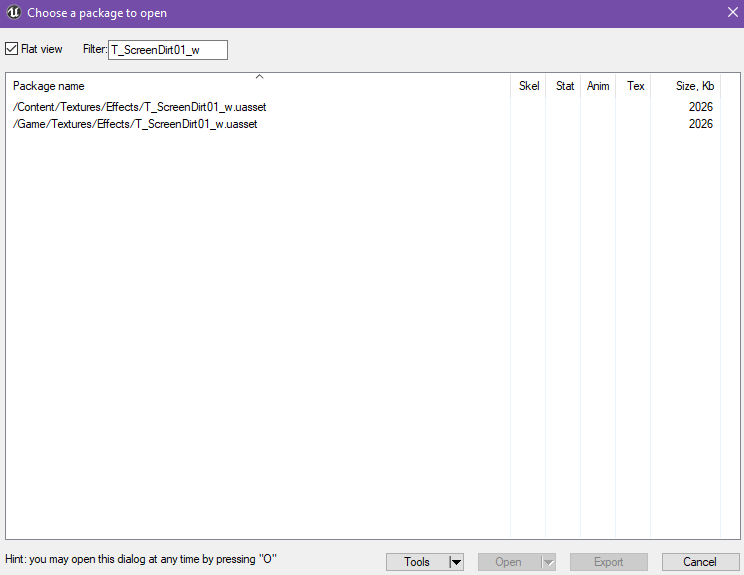
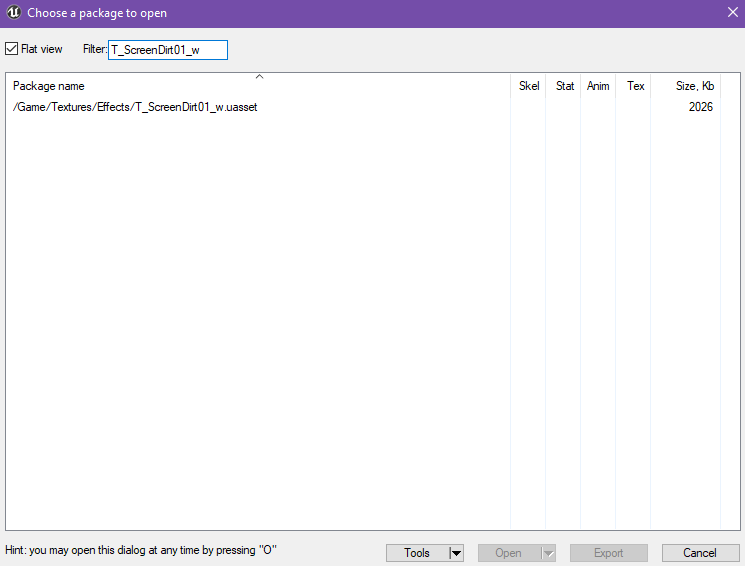
    1. Open UE Viewer (step [1]), and point it to the game’s pak folder with your mod still installed. In the vast majority of cases, you should only see the file you edited appear once!
      1. Bad
      2. Good
    2. QuickBMS (optional download mentioned at the top) can also be useful in determining the correct folder location. Extract all PAK files, and match your mod folder up.
  4. Did you use the correct UnrealPak?
  5. Did you name the pak to load last? Ensure that alphabetically the pak’s name falls after the default paks.
    1. Suggestion: Start the pak’s file name with a “Z”.